Save 50 to 95% on quantity work: Auditable BIM takeoffs for estimators

In short
A BIM quantity takeoff extracts measurable quantities directly from an IFC or Revit model and delivers a bill of quantities that is traceable to each element’s GlobalId, not just a set of totals someone typed into a spreadsheet. The workflow that produces defensible numbers has four stages: prepare the model, extract the quantities, validate them against the source, then integrate the results into your estimating tools. Done correctly, the output is an Excel or CSV file with grouped summaries and detail rows an auditor can trace back to a single wall, slab, or duct run.
02
The term “quantity takeoff” predates BIM by decades. It originally meant a quantity surveyor manually measuring lengths, areas, and volumes off 2D drawings with a scale rule or digitizer. A BIM quantity takeoff automates that measurement by querying the geometry and data embedded in a coordinated 3D model, so every quantity is tied to a specific element rather than a hand annotation on a PDF.
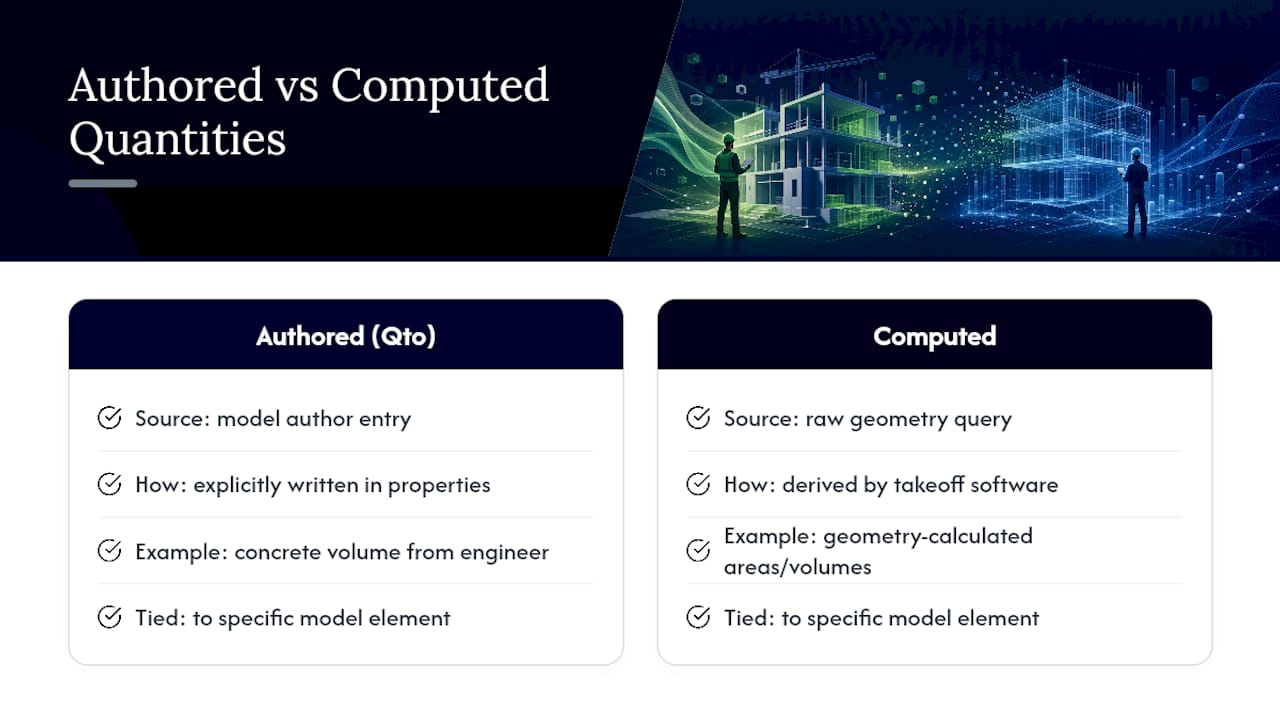
The distinction that matters for estimators is between authored and computed quantities. An authored quantity, sometimes called a Qto (quantity set), is a value the model author explicitly entered, such as a concrete volume calculated by a structural engineer’s tool and written into the element’s properties. A computed quantity is one your takeoff software derives from raw geometry when no authored value exists. Neither is inherently wrong, but they should never be mixed in a total without a note explaining which is which. Academic research on BIM-based quantity takeoff confirms that model quality, measurement-rule definitions, and data consistency remain the primary factors limiting takeoff accuracy, which is exactly why the prepare and validate stages carry as much weight as extraction itself.
03
Running a clean extraction is a sequence, not a single click. Skip a step and you inherit someone else’s modeling shortcuts as pricing errors.
Before you call an extraction done, run through this quick checklist:
Pro Tip: Keep a “problem elements” tab in your extraction template that automatically flags rows with blank Qto values. That single tab will save you more rework hours than any other habit on this list.
04
Quantities are only as reliable as the model feeding them. Before you extract anything, walk through a short hygiene pass:
None of this takes long on a well-managed model. It takes considerably longer to unwind a priced estimate after discovering the slab quantities were counted twice because a linked structural model overlapped the architectural one.
05
Detail rows and grouped summaries serve different audiences, and a mature takeoff workflow produces both rather than forcing one export to do both jobs.
06
A takeoff that has not been validated is a guess with good formatting. Run these checks before anyone prices a single line:
Pro Tip: *Reserve validation time for your highest-value line items first.
07
A validated export is only useful once it becomes a priced line item. Map each element type to a work breakdown structure (WBS) code and a rate from your library, so the takeoff’s “Concrete, C30/37, Foundation” row becomes a priced line without manual retyping. Build this mapping table once and reuse it across projects of a similar type.
Live-linking your takeoff template to the model means every design revision regenerates the same grouped structure automatically, instead of forcing someone to rebuild the spreadsheet from scratch each time a wall moves. That repeatability is where the commercial payoff shows up.
Customers using Yesper’s IFC-based takeoff capability report 50 to 95 percent time saved on quantity-related project work, alongside catching errors human reviewers missed on the first pass.
That range is wide because scope varies enormously between a single-trade pilot and a full multi-discipline rollout, which is exactly why a scoped pilot matters before committing to a full workflow change.
08
Most takeoff disputes trace back to the same handful of mistakes: double-counted elements from overlapping linked models, mismatched units slipping through an authored-versus-computed swap, missing Qto values silently defaulting to zero, and ungrouped element types splintering a single material into a dozen near-duplicate rows.
| Checklist item | Quick mitigation | Typical sign-off owner |
|---|---|---|
| GlobalId traceability | Confirm export includes GlobalId column | BIM technician |
| Sample-row backcheck | Spot-check 5 to 10 elements per category | Estimator |
| Saved template | Store pipeline with grouping rules documented | BIM manager |
| Revision note | Log model version and pull date on export | BIM technician |
09
The estimator’s job used to center on measurement. Model-based takeoff automation is pushing that center of gravity toward commercial judgment: which discrepancies matter, which rates need renegotiating, which elements need a second look before a client sees the number. That shift rewards estimators who can read a validation log as fluently as they once read a scale rule. Teams that resist it by treating the model as a drawing substitute, rather than a data source, are the ones still reconciling double-counted slabs three days before tender close. Run the template-first pilot before you scale anything wider.
10
Manually re-measuring a model that already contains the data is the kind of overhead most estimating teams accept simply because it’s always been done that way. This product works differently: it produces a bill of quantities directly from an IFC model, preserving GlobalId traceability on every row so the export holds up under scrutiny from a client or auditor. Teams running pilots report 50 to 95 percent time saved on the quantity work itself, with the added benefit of catching modeling errors before they turn into pricing errors. A sensible next step is a scoped pilot on a single trade package rather than a full workflow overhaul. Visit Yesper’s company page to arrange a demo and see what a pilot looks like on one of your own models.

FAQ
Open the current model revision, confirm project units, then use a schedule or a takeoff tool like Ideate BIMLink to pull authored quantities by category. Export the schedule data to Excel or CSV, keeping GlobalId visible so each row stays traceable to its source element.
A quantity takeoff is the measurement of materials, areas, and volumes required for a construction project, traditionally done by hand from drawings. In a BIM context, it means extracting those same quantities directly from a 3D model’s geometry and data instead of measuring drawings manually.
Quantities come from either authored values entered by the model’s discipline engineers (a Qto) or values computed automatically from an element’s geometry when no authored value exists. Good takeoff tools record which method produced each quantity, so estimators can judge how much to trust a given number.
The right tool depends on whether your model lives in Revit, IFC, or a mixed environment, and whether you need desktop control or cloud collaboration. Platforms like Yesper are built specifically to generate an auditable bill of quantities straight from an IFC model with GlobalId traceability, which matters more for estimating teams than raw feature counts.
Traditional 2D takeoff measures drawings by hand or with a digitizer, which introduces human error and offers no traceability back to a specific building element. A model-based takeoff pulls quantities from the 3D model’s own data, updates automatically when the design changes, and traces every number back to a GlobalId for auditing.
This post was written with AI assistance and published by Yesper. General information, not professional advice: requirements vary by project and jurisdiction, and the professional responsible for the project decides what applies. Spotted an error? Write to benjamin@yesper.ai.
Get news and articles in your inbox.
Yesper is the AI civil engineer for construction and infrastructure. AFRY, COWI, NRC Group and other Nordic firms use it to halve the time on a study, rerun calculations in minutes, and catch errors that would otherwise slip through. Get in touch if you'd like to see what it can do for you.
Book demo